如果您不想費心創建(或搜尋)全螢幕反鋸齒函式。
您實際上可以作弊(嗯,其實有點像是個骯髒低效的駭客方法!!)
並使用 'imagecopyresampled' 對圖像執行假的反鋸齒...
首先,創建一個大小是您實際所需兩倍的來源圖像。
然後使用 'imagecopyresampled' 將其縮小到一半大小,該函式
會自動插入像素以產生反鋸齒效果!
我在圓餅圖函式中使用了這個方法,效果非常好,
不像我認為的那麼慢!
下面的粗略程式碼應該可以讓您了解...
<?php
$realWidth = 500;
$realHeight = 500;
$srcWidth = $realWidth * 2;
$srcHeight = $realHeight * 2;
// 建立較大的來源圖像
$srcImage = imagecreatetruecolor($srcWidth,$srcHeight);
// 建立真實/最終圖像
$destImage = imagecreatetruecolor($realWidth,$realHeight);
// 現在在來源圖像中繪製您想要的任何內容
// 等等....
// 現在圖片已完成,進行縮小...
imagecopyresampled($destImage,$srcImage,0,0,0,0,
$realWidth,$realHeight,$srcWidth,$srcHeight);
// 現在只需對 '$destImage' 執行您想要的任何操作(例如顯示或輸出到檔案!)
?>imageantialias
(PHP 4 >= 4.3.2, PHP 5, PHP 7, PHP 8)
imageantialias — 是否使用反鋸齒功能
說明
啟用用於線條和多邊形的快速繪製反鋸齒方法。它不支援 Alpha 元件。它使用直接混合操作。它僅適用於真彩色影像。
不支援粗細和樣式。
將反鋸齒圖元與透明背景顏色一起使用可能會導致一些意外結果。混合方法使用背景顏色作為任何其他顏色。缺少 Alpha 元件支援不允許使用基於 Alpha 的反鋸齒方法。
更新日誌
| 版本 | 說明 |
|---|---|
| 8.0.0 |
image 參數現在需要一個 GdImage 實例;先前,需要一個有效的 gd 資源。 |
| 7.2.0 | imageantialias() 現在普遍可用。以前,只有在 PHP 使用內建版本的 GD 函式庫編譯時才可用。 |
範例
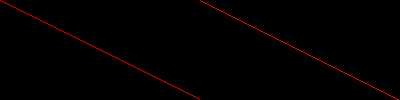
範例 #1 比較兩條線,其中一條開啟了反鋸齒
<?php
// 建立一個反鋸齒影像和一個普通影像
$aa = imagecreatetruecolor(400, 100);
$normal = imagecreatetruecolor(200, 100);

// 對於其中一個影像啟用反鋸齒
imageantialias($aa, true);

// 配置顏色
$red = imagecolorallocate($normal, 255, 0, 0);
$red_aa = imagecolorallocate($aa, 255, 0, 0);

// 繪製兩條線,一條啟用反鋸齒
imageline($normal, 0, 0, 200, 100, $red);
imageline($aa, 0, 0, 200, 100, $red_aa);

// 將兩個影像並排合併以輸出 (反鋸齒:左,普通:右)
imagecopymerge($aa, $normal, 200, 0, 0, 0, 200, 100, 100);

// 輸出影像
header('Content-type: image/png');

imagepng($aa);
imagedestroy($aa);
imagedestroy($normal);
?>
以上範例將輸出類似以下的內容
另請參閱
- imagecreatetruecolor() - 建立新的真彩色影像
+新增筆記
使用者貢獻的筆記 8 則筆記
padigan 
17 年前
trimbo 
19 年前
到目前為止,使用 PHP 5.0.4 我已成功讓 Imageantialias() 與以下函式良好搭配:
ImageLine()
ImagePolygon()

但無法與以下函式搭配:
ImageArc()
ImageEllipse()
ImageFilled*()

您仍然可以透過在具有相同尺寸的填充多邊形上繪製空心多邊形來繪製反鋸齒填充多邊形
<?php
 $points=array($x,$y, $x2,$y2, $x3,$y3);
 imageFilledPolygon($im, $points, 3, $gray );
 imagePolygon($im, $points, 3, $gray );
?>
n-dream at gmx dot ch 
18 年前
以下函式繪製一個反鋸齒(未填充)的橢圓。
它的用法與一般的 ImageEllipse 函式相同。
可選參數設定段數...

function ImageEllipseAA( &$img, $x, $y, $w, $h, $color, $segments=70)
{
$w=$w/2;
$h=$h/2;
$jump=2*M_PI/$segments;
$oldx=$x+sin(-$jump)*$w;
$oldy=$y+cos(-$jump)*$h;
for($i=0;$i<2*(M_PI);$i+=$jump)
    {
$newx=$x+sin($i)*$w;
$newy=$y+cos($i)*$h;
ImageLine($img,$newx,$newy,$oldx,$oldy,$color);
$oldx=$newx;
$oldy=$newy;
    }
}
verdy_p at wanadoo dot fr 
14 年前
快速演算法(「速度快 20 倍」)中的這些行有一個小的編輯錯誤

imageLine( $img, $cx + $ix, $cy + $iy - 1, $cx + $ix, $cy + $ix, $fill );
imageLine( $img, $cx + $ix, $cy - $iy + 1, $cx + $ix, $cy - $ix, $fill );
imageLine( $img, $cx - $ix, $cy + $iy - 1, $cx - $ix, $cy + $ix, $fill );
imageLine( $img, $cx - $ix, $cy - $iy + 1, $cx - $ix, $cy - $ix, $fill );
imageLine( $img, $cx + $iy - 1, $cy + $ix, $cx + $ix, $cy + $ix, $fill );
imageLine( $img, $cx + $iy - 1, $cy - $ix, $cx + $ix, $cy - $ix, $fill );
imageLine( $img, $cx - $iy + 1, $cy + $ix, $cx - $ix, $cy + $ix, $fill );
imageLine( $img, $cx - $iy + 1, $cy - $ix, $cx - $ix, $cy - $ix, $fill );

每次呼叫的參數中(就在 ", $fill " 參數之前)對 "$ix" 的引用有時應該是 "$iy"。

此演算法使用 Bresenham 中點演算法繪製圓形,但會以圓心 ($cx, $cy) 為基準,在第一個八分圓中遞增計算連續像素位置 ($ix, $iy),然後透過交換它們或更改符號來應用 8 個對稱性。

橢圓也存在類似的演算法:當橢圓焦軸與兩個圖像軸對齊或正交時,它使用象限對稱而不是八分圓對稱,將每個象限細分為兩個區域(由弧上切線斜率為 1 的點界定)。

對於一般的橢圓(在平面上任意旋轉),也存在 4 象限對稱性,但計算起來比較複雜,因為需要計算旋轉。因此,您只能使用 2 個對稱性,但增量演算法仍然存在:您可能會認為這是基於從兩個焦點到橢圓上點的距離之和的計算,該距離總和是一個常數;然而,兩個距離的和不能簡單地平方(您需要計算兩個距離的平方,然後取它們各自的平方根,再將它們相加,並將結果與確切的長度進行比較)。一個更簡潔的解決方案是使用 NURBS(非均勻有理 B 樣條),因為它們數值穩定且計算速度非常快(您只需要一些浮點數作為節點常數來分隔每個象限,然後使用橢圓的簡單二次參數方程式而不是隱式方程式來計算,因為二次(多項式)方程式的一階和二階導數很容易限制,以便獲得所需的精度並減少不必要的像素繪製:這樣的參數方程式將沿著弧線繪製點,移動速度在每個增量步驟中變化,介於 1 到 4 個子像素距離之間,但實際上當您將象限細分為兩個區域時,速度只在 1 到 2 個子像素之間)。

或者,您也可以繪製一個雙解析度的反鋸齒「直」橢圓,然後旋轉反鋸齒圖像,同時將其縮小到一半大小,並同時將其與目標圖像合併:根據實現方式(以及使用的計算語言),這可能會更快(但可能需要更多記憶體來儲存縮放 2 倍的中間圖像)……
dsl101 
15 年前
在嘗試了很長時間並努力獲得一個像樣的反鋸齒圓形函式後,我最終還是從頭開始寫了一個。它非常非常簡單——基本上檢查外接正方形中的每個像素,但結果產生了非常好的反鋸齒效果,可以很好地控制筆劃寬度、反鋸齒量和反鋸齒的緊密度。我相信它可以進一步最佳化,但它對我的工作來說已經足夠快了。希望它能有所幫助。

<?php

function imagecircleaa($img, $cx, $cy, $r, $w, $s, $t, $color) // image, centerX, centerY, radius, stroke width, aa width, tightness, color
{
 $adj = $w + $s;
 $sCol = imagecolorallocate($img, $color['r'], $color['g'], $color['b']);
 for($x = -$r - $adj; $x <= $r + $adj; $x++)
 {
 for($y = -$r - $adj; $y <= $r + $adj; $y++)
 {
 $d = sqrt($x * $x + $y * $y); // distance from pixel to center
 $err = abs($d - $r); // absolute distance from pixel to circle edge
 if($err <= $w / 2 + $s) // within the stroke width + smoothing radius
 {
 if($err <= $w / 2) // inside the stroke width so make it solid color
 {
 $aaCol = $sCol;
 }
 else // in the antialisaing region so make it a blended color
 {
 $err -= $w / 2; // adjust to the aliased part
 $err = 1 - $err / $s; // adjust to between 0 and 1
 $err = ($err - 0.5) * $t * 2; // adjust to -$t to +$t for tightness
 $err = ($err / sqrt(1 + $err * $err) + 1) / 2; // sigmoid curve to smooth edges
 $rgb = imagecolorat($img, $x + $cx, $y + $cy); // Get current background color
 $rB = ($rgb >> 16) & 0xFF;
 $gB = ($rgb >> 8) & 0xFF;
 $bB = $rgb & 0xFF;
 $rDelta = ($rB - $color['r']); // change in Red from background
 $rComp = $rB - $rDelta * $err; // mix Red
 $gDelta = ($gB - $color['g']); // change in Red from background
 $gComp = $gB - $gDelta * $err; // mix Red
 $bDelta = ($bB - $color['b']); // change in Red from background
 $bComp = $bB - $bDelta * $err; // mix Red
 $aaCol = imagecolorallocate($img, $rComp, $gComp, $bComp);
 }
 imagesetpixel($img, $x + $cx, $y + $cy, $aaCol);
 }
 }
 }
}

$img = imagecreatetruecolor(500,500);

$cBlack = imagecolorallocate($img, 0, 0, 0);
$cGrey = imagecolorallocate($img, 120, 120, 120);
$cWhite = imagecolorallocate($img, 255, 255, 255);

imagefill($img, 0, 0, $cWhite);
imagepolygon($img, array(0, 0,200, 0, 200, 200, 0, 200), 4, cBlack);

$aWhite = array('r'=>255, 'g'=>255, 'b'=>255);
$aBlack = array('r'=>0, 'g'=>0, 'b'=>0);
$aRed = array('r'=>200, 'g'=>0, 'b'=>0);
$aGreen = array('r'=>0, 'g'=>200, 'b'=>0);
$aBlue = array('r'=>0, 'g'=>0, 'b'=>255);

// standard ellipse function for comparison
imageellipse($img, 100, 100, 50, 50, $cBlack);

// compare different tightnesses - good values are between 2 and 8
// note overall width is stroke width + 2 * aa width (e.g. 12 pixels below)
imagecircleaa($img, 50, 50, 25, 2, 5, 2, $aBlue);
imagecircleaa($img, 50, 150, 25, 2, 5, 8, $aBlue);

// different coloured background to show blending
imagefilledrectangle($img, 150,150, 200, 200, $cGrey);
imagecircleaa($img, 150, 150, 25, 3, 2, 2, $aRed);

// overlapping circles still aa nicely, although the colour blending algorithm produces quite dark intermediate shades
imagecircleaa($img, 150, 60, 25, 2, 3, 2, $aBlue);
imagecircleaa($img, 150, 50, 25, 2, 3, 2, $aGreen);

header("Content-type: image/png");
imagepng($img);
imagedestroy($img);
?>
klaas at kosmokrator dot com 
18 年前
這是 sebbi 的反鋸齒圓形函式最佳化版本的最佳化版本:(速度提高了 20 倍以上)……

<?php

 function imageSmoothCircle( &$img, $cx, $cy, $cr, $color ) {
 $ir = $cr;
 $ix = 0;
 $iy = $ir;
 $ig = 2 * $ir - 3;
 $idgr = -6;
 $idgd = 4 * $ir - 10;
 $fill = imageColorExactAlpha( $img, $color[ 'R' ], $color[ 'G' ], $color[ 'B' ], 0 );
 imageLine( $img, $cx + $cr - 1, $cy, $cx, $cy, $fill );
 imageLine( $img, $cx - $cr + 1, $cy, $cx - 1, $cy, $fill );
 imageLine( $img, $cx, $cy + $cr - 1, $cx, $cy + 1, $fill );
 imageLine( $img, $cx, $cy - $cr + 1, $cx, $cy - 1, $fill );
 $draw = imageColorExactAlpha( $img, $color[ 'R' ], $color[ 'G' ], $color[ 'B' ], 42 );
 imageSetPixel( $img, $cx + $cr, $cy, $draw );
 imageSetPixel( $img, $cx - $cr, $cy, $draw );
 imageSetPixel( $img, $cx, $cy + $cr, $draw );
 imageSetPixel( $img, $cx, $cy - $cr, $draw );
 while ( $ix <= $iy - 2 ) {
 if ( $ig < 0 ) {
 $ig += $idgd;
 $idgd -= 8;
 $iy--;
 } else {
 $ig += $idgr;
 $idgd -= 4;
 }
 $idgr -= 4;
 $ix++;
 imageLine( $img, $cx + $ix, $cy + $iy - 1, $cx + $ix, $cy + $ix, $fill );
 imageLine( $img, $cx + $ix, $cy - $iy + 1, $cx + $ix, $cy - $ix, $fill );
 imageLine( $img, $cx - $ix, $cy + $iy - 1, $cx - $ix, $cy + $ix, $fill );
 imageLine( $img, $cx - $ix, $cy - $iy + 1, $cx - $ix, $cy - $ix, $fill );
 imageLine( $img, $cx + $iy - 1, $cy + $ix, $cx + $ix, $cy + $ix, $fill );
 imageLine( $img, $cx + $iy - 1, $cy - $ix, $cx + $ix, $cy - $ix, $fill );
 imageLine( $img, $cx - $iy + 1, $cy + $ix, $cx - $ix, $cy + $ix, $fill );
 imageLine( $img, $cx - $iy + 1, $cy - $ix, $cx - $ix, $cy - $ix, $fill );
 $filled = 0;
 for ( $xx = $ix - 0.45; $xx < $ix + 0.5; $xx += 0.2 ) {
 for ( $yy = $iy - 0.45; $yy < $iy + 0.5; $yy += 0.2 ) {
 if ( sqrt( pow( $xx, 2 ) + pow( $yy, 2 ) ) < $cr ) $filled += 4;
 }
 }
 $draw = imageColorExactAlpha( $img, $color[ 'R' ], $color[ 'G' ], $color[ 'B' ], ( 100 - $filled ) );
 imageSetPixel( $img, $cx + $ix, $cy + $iy, $draw );
 imageSetPixel( $img, $cx + $ix, $cy - $iy, $draw );
 imageSetPixel( $img, $cx - $ix, $cy + $iy, $draw );
 imageSetPixel( $img, $cx - $ix, $cy - $iy, $draw );
 imageSetPixel( $img, $cx + $iy, $cy + $ix, $draw );
 imageSetPixel( $img, $cx + $iy, $cy - $ix, $draw );
 imageSetPixel( $img, $cx - $iy, $cy + $ix, $draw );
 imageSetPixel( $img, $cx - $iy, $cy - $ix, $draw );
 }
 }

 $img = imageCreateTrueColor( 320, 240 );

 imageSmoothCircle( $img, 160, 120, 100, array( 'R' => 0xCC, 'G' => 0x33, 'B' => 0x00 ) );
 imageSmoothCircle( $img, 170, 110, 75, array( 'R' => 0xDD, 'G' => 0x66, 'B' => 0x00 ) );
 imageSmoothCircle( $img, 180, 100, 50, array( 'R' => 0xEE, 'G' => 0x99, 'B' => 0x00 ) );
 imageSmoothCircle( $img, 190, 90, 25, array( 'R' => 0xFF, 'G' => 0xCC, 'B' => 0x00 ) );

 header( 'Content-Type: image/png' );
 imagePNG( $img );

?>
sebbi at conceptT dot com 
19 年前
我在 Google 中搜尋,找到了以下網址
http://www.isocalc.com/tutorials/antialias.htm
通過這個教學,我能夠編寫一個函式將此演算法轉換為 php,填充圓的結果如下
<?php
function imagefilledcircleantialiased(&$im, $cx, $cy, $r, $fgcolor, $bgcolor) {
 $fgcolors = imagecolorsforindex($im,$fgcolor);
 $bgcolors = imagecolorsforindex($im,$bgcolor);
 for ( $x = $cx - $r; $x <= $cx + $r; $x++ ) {
 for ( $y = $cy - $r; $y <= $cy + $r; $y++ ) {
 $rx = $x - $cx; $ry = $y - $cy;
 $ir = sqrt(( $rx == 0 ? 0 : pow($rx - 0.5*abs($rx)/$rx, 2) ) + ( $ry == 0 ? 0 : pow($ry - 0.5*abs($ry)/$ry, 2) ));
 $or = sqrt(( $rx == 0 ? 0 : pow($rx + 0.5*abs($rx)/$rx, 2) ) + ( $ry == 0 ? 0 : pow($ry + 0.5*abs($ry)/$ry, 2) ));
 if ( $or <= $r ) {
 imagesetpixel($im, $x, $y, $fgcolor);
 }
 elseif ( $ir < $r ) {
 $filled = 0;
 for ( $xx = $x - 0.45; $xx < $x + 0.5; $xx+=0.1 ) {
 for ( $yy = $y - 0.45; $yy < $y + 0.5; $yy+=0.1 ) {
 $rxx = $xx - $cx; $ryy = $yy - $cy;
 if ( sqrt(pow($rxx, 2) + pow($ryy, 2)) < $r ) $filled++;
 }
 }
 $red = round($bgcolors['red'] + ( $fgcolors['red'] - $bgcolors['red'] ) * $filled / 100);
 $green = round($bgcolors['green'] + ( $fgcolors['green'] - $bgcolors['green'] ) * $filled / 100);
 $blue = round($bgcolors['blue'] + ( $fgcolors['blue'] - $bgcolors['blue'] ) * $filled / 100);
 imagesetpixel($im, $x, $y, imagecolorclosest($im, $red, $green, $blue));
 }
 }
 }
}

$width = 160;
$height = 200;
$r = 20;
$bgc = "651713";
$fgc = "b12b2c";

$im = imagecreate($width, $height);
$bgcolor = imagecolorallocate($im, hexdec(substr($bgc, 0, 2)), hexdec(substr($bgc, 2, 2)), hexdec(substr($bgc, 4, 2)));
for( $i = 0; $i < 100; $i++ ) {
 imagecolorallocate($im, ( hexdec(substr($fgc, 0, 2)) + $i*hexdec(substr($bgc, 0, 2))) / ($i + 1), ( hexdec(substr($fgc, 2, 2)) + $i*hexdec(substr($bgc, 2, 2))) / ($i + 1), ( hexdec(substr($fgc, 4, 2)) + $i*hexdec(substr($bgc, 4, 2))) / ($i + 1));
}
$fgcolor = imagecolorclosest($im, hexdec(substr($fgc, 0, 2)), hexdec(substr($fgc, 2, 2)), hexdec(substr($fgc, 4, 2)));

imagefilledcircleantialiased($im, 80, 100, $r, $fgcolor, $bgcolor);

header("Content-Type: image/png");
imagepng($im);
?>
An improvement would be to draw the inner rectangle or more rectangles in the circle with the builtin rectangle function to reduce the usage of imagesetpixel() from (2*r)^2 to 2*Pi*(r + epsilon), in other words, the dependency on r would break down from square to linear.
另一個改進是在觀察到的像素中確定填充和未填充的三角形並計算它們的面積,這樣我們就可以擺脫用於獲取填充/未填充部分的內部迴圈。
可以輕鬆修改此函式來解決其他問題,例如線條、未填充的圓形等。
voinic at NOSgmailPAM dot com 
18 年前
我發現繪製反鋸齒多邊形並保持其透明(例如,將其用作 Google 地圖中的疊加層)的唯一技巧……是製作兩個圖像並將它們合併。操作順序很重要,最終圖像的透明顏色必須在合併後設定。

<?
header("Content-type: image/png");

$values = array(
40, 50, // 點 1 (x, y)
20, 240, // 點 2 (x, y)
60, 60, // 點 3 (x, y)
240, 20, // 點 4 (x, y)
50, 40, // 點 5 (x, y)
10, 10 // 點 6 (x, y)
           );

$im = imagecreate(250, 250);
$bg = imagecolorallocate($im, 255, 255, 255);

$im2 = imagecreatetruecolor(250, 250);
$bg2 = imagecolorallocate($im2, 255, 255, 255);
imagefilledrectangle($im2,0,0,249,249,$bg2);
imagecolortransparent($im2, $bg);
imageantialias($im2, true);
$c_red = imagecolorallocate($im2, 255, 0, 0);
imagepolygon($im2, $values, 6, $c_red);
imageantialias($im2, false);

imagecopymerge($im, $im2,0,0,0,0,250,250,50);

imagecolortransparent($im, $bg);
$c_red_alpha = imagecolorallocatealpha($im, 255, 0, 0, 60);
imagefilledpolygon($im, $values, 6, $c_red_alpha);

imagepng($im);
imagedestroy($im);
imagedestroy($im2);
?>