顯然,如果啟用反鋸齒,imagesetthickness 就無法正常運作。imagesetthickness
(PHP 4 >= 4.0.6, PHP 5, PHP 7, PHP 8)
imagesetthickness — 設定線條繪製的粗細
說明
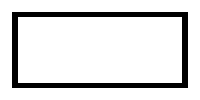
imagesetthickness() 設定繪製矩形、多邊形、弧形等線條的粗細為 thickness 像素。
範例
範例 #1 imagesetthickness() 範例
<?php
// 建立一個 200x100 的影像
$im = imagecreatetruecolor(200, 100);
$white = imagecolorallocate($im, 0xFF, 0xFF, 0xFF);
$black = imagecolorallocate($im, 0x00, 0x00, 0x00);

// 將背景設為白色
imagefilledrectangle($im, 0, 0, 299, 99, $white);

// 將線條粗細設為 5
imagesetthickness($im, 5);

// 繪製矩形
imagerectangle($im, 14, 14, 185, 85, $black);

// 將影像輸出到瀏覽器
header('Content-Type: image/png');

imagepng($im);
imagedestroy($im);
?>
上述範例將輸出類似以下的內容

+新增註釋
使用者貢獻的註釋 9 則註釋
azinkey at gmail dot com 
11 年前
感謝 circle14,

只需更改該行,即可看到它解決了我們對橢圓的需求

while ($line < $thickness) {
$line++;
$elipse_w--;
imageellipse($image, $pos_x, $pos_y, $elipse_w, $elipse_h, $color);
$elipse_h--;
    }
fred at nowhere dot fr 
15 年前
還有一點需要提的是,imagesetthickness() 會作用於接下來繪製的物件。
例如:您可以使用厚度為 1 的線條在圖形中繪製網格

透過呼叫 imagesetthickness($image, 1);

... 繪製網格的程式碼...

然後呼叫 imagesetthickness 並以厚度為 3 的線條繪製圖形線條
imagesetthickness($image, 3);
... 繪製圖形線條的程式碼...

希望這個說明有幫助...
jean-raymond dot chauviere at gmail dot com 
15 年前
一個更容易管理粗細的方法是在繪製橢圓之前,使用兩種不同顏色的橢圓來處理


<?php
 imagefilledellipse ($this->image,60,42,57,57,$drawColor);
 imagefilledellipse ($this->image,60,42,45,45,$backColor);
?>

第一行使用所需的顏色繪製一個實心橢圓,第二行使用背景顏色從相同的中心繪製一個較小的橢圓。


這個方法的缺點是它會清除橢圓中間的所有內容。
gmail.com@mspreij 
8 年前
如您在範例圖片中所見,左側和右側比應有的寬度寬 1 px,這在任何寬度 > 1 的情況下都會發生。
編寫了這個函式來修正這個問題……但可能不是直接替代方案。它會在給定座標的*周圍*繪製一個矩形,適用於任何寬度的線條。

<?php
// 在給定的座標周圍繪製一條寬度為 $width 的線,要注意 0,0,1,1 會產生一個 2×2 的正方形
function imagelinerectangle($img, $x1, $y1, $x2, $y2, $color, $width=1) {
 imagefilledrectangle($img, $x1-$width, $y1-$width, $x2+$width, $y1-1, $color);
 imagefilledrectangle($img, $x2+1, $y1-$width, $x2+$width, $y2+$width, $color);
 imagefilledrectangle($img, $x1-$width, $y2+1, $x2+$width, $y2+$width, $color);
 imagefilledrectangle($img, $x1-$width, $y1-$width, $x1-1, $y2+$width, $color);
}
?>
admin at circle14 dot net 
15 年前
這是我寫的一個自訂函式,用於解決橢圓線條粗細的問題


<?php
函數 draw_oval ($image, $pos_x, $pos_y, $elipse_width, $elipse_height, $color, $px_thick) {
 $line = 0;
 $thickness = $px_thick;
 $elipse_w = $elipse_width;
 $elipse_h = $elipse_height;
 while ($line < $thickness) {
 imageellipse($image, $pos_x, $pos_y, $elipse_w, $elipse_h, $color);
 $line++;
 $elipse_w--;
 $elipse_h--;
 }
}
?>

希望這個對您有所幫助。
baldurien at bbnwn dot eu 
16 年前
imagesetthickness 與 imagerectangle() 的運作方式相當奇怪。

<?php
imagesetthickness(1);
imagerectangle($im, 10, 10, 50, 50, $red);
?>

這會畫一個 41x41 的正方形(因為 gd 需要包含右下角的像素,50 應該被 49 取代)。這會像這樣運作:

<?php
imageline($im, 10, 10, 10, 50, $red);
imageline($im, 10, 10, 50, 10, $red);
imageline($im, 50, 10, 50, 50, $red);
imageline($im, 10, 50, 50, 50, $red);
?>

第二個例子

<?php
imagesetthickness(2);
imagerectangle($im, 10, 10, 50, 50, $red);
?>

這會畫出一個 43x43 的正方形,因為邊框厚度設定為 2。*然而* 這並不是在原本 41x41 正方形周圍環繞 2 個像素的「正常」邊框!

左右兩側的厚度會是 3,而上下兩側的厚度會是 2。

如果你採用 imageline 的例子,但在之前設定厚度為 2,這*幾乎*可以達到效果:正方形最左邊的像素不會被畫出來。

總結:

1) 不要忘記所畫矩形的 (寬度, 高度) 是 (x2-x1+1, y2-y1+1)
2) 在矩形上,厚度實作不良(或者至少,其行為沒有被記錄),因為左右兩側的厚度並非預期。
3) 使用 4 個 imageline() 應該可以解決問題,但在「修補」左上角像素之後。